Azure
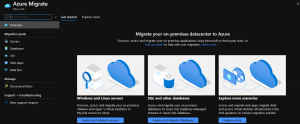
Azure Migrate
A central hub of Azure cloud migration services and tools to discover, assess and migrate workloads to the cloud
It provides the following:
- Unified migration platform: A single portal to start, run, and track your migration to Azure.
- Range of tools: A range of tools for assessment and migration. Azure Migrate tools include Server Assessment and Azure Migrate: Server Migration. Azure Migrate also integrates with other Azure services and tools, and with independent software vendor (ISV) offerings.
- Assessment and migration: In the Azure Migrate hub, you can assess and migrate:
- Servers: Assess on-premises servers and migrate them to Azure virtual machines or Azure VMware Solution (AVS) (Preview).
- Databases: Assess on-premises databases and migrate them to Azure SQL Database or to SQL Managed Instance.
- Web applications: Assess on-premises web applications and migrate them to Azure App Service by using the Azure App Service Migration Assistant.
- Virtual desktops: Assess your on-premises virtual desktop infrastructure (VDI) and migrate it to Windows Virtual Desktop in Azure.
- Data: Migrate large amounts of data to Azure quickly and cost-effectively using Azure Data Box products.
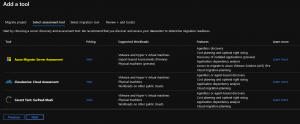
Azure Migrate: Server Assessment tool
The Azure Migrate: Server Assessment tool discovers and assesses on-premises VMware VMs, Hyper-V VMs, and physical servers for migration to Azure.
Here’s what the tool does:
- Azure readiness: Assesses whether on-premises machines are ready for migration to Azure.
- Azure sizing: Estimates the size of Azure VMs or the number of Azure VMware nodes after migration.
- Azure cost estimation: Estimates costs for running on-premises servers in Azure.
- Dependency analysis: Identifies cross-server dependencies and optimization strategies for moving interdependent servers to Azure. Learn more about Server Assessment with dependency analysis.
Server Assessment uses a lightweight Azure Migrate appliance that you deploy on-premises.
- The appliance runs on a VM or physical server. You can install it easily using a downloaded template.
- The appliance discovers on-premises machines. It also continually sends machine metadata and performance data to Azure Migrate.
- Appliance discovery is agentless. Nothing is installed on discovered machines.
- After appliance discovery, you can gather discovered machines into groups and run assessments for each group.
Azure Migrate: Server Migration tool
The Azure Migrate: Server Migration tool helps you migrate to Azure:
Azure migrate involves 3 major process
- Preparing for assessment and migration
- Assess the physical servers
- Migrate the physical servers
Preparing for assessment and migration:
- Assign permissions to create a project
- Assign permissions to register the appliance
- Grant account permissions
- Prepare Azure for physical server migration
- Assign permissions to create a project
- Assign Azure account permissions
- Create an Azure network
- Verify physical server settings
- Set up an account for physical server discovery
- Prepare for physical server migration
Assess the physical servers for migration:
1.Create few Linux servers in AWS & install sample applications or create folders
2. Create 2 Windows servers; 1 for Virtual appliance for Azure migrate, 1 for process/configuration servers for replication
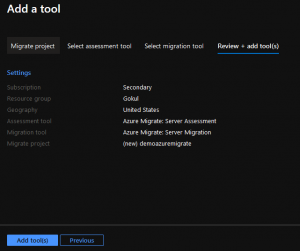
3. Create Azure migrate project
Click on the “Asses and migrate servers” option & follow the onscreen instruction.

Set up the appliance
Azure Migrate: Server Assessment runs a lightweight appliance.
- This appliance performs physical server discovery and sends server metadata and performance data to Azure Migrate Server Assessment.
- To set up the appliance you:
- Download a zipped file with Azure Migrate installer script from the Azure portal.
- Extract the contents from the zipped file. Launch the PowerShell console with administrative privileges.
- Execute the PowerShell script to launch the appliance web application.
- Configure the appliance for the first time, and register it with the Azure Migrate project.
- You can set up multiple appliances for a single Azure Migrate project. Across all appliances, you can discover any number of physical servers. A maximum of 1000 servers can be discovered per appliance.
Download the installer script
Download the zipped file for the appliance.
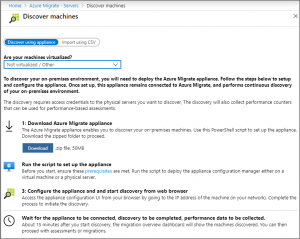
- In Migration Goals> Servers > Azure Migrate: Server Assessment, click Discover.
- In Discover machines> Are your machines virtualized?, click Not virtualized/Other.
- Click Download to download the zipped file.
Verify security
Check that the zipped file is secure before you deploy it.
- On the machine to which you downloaded the file, open an administrator command window.
- Run the following command to generate the hash for the zipped file:
- C:\>CertUtil -HashFile <file_location> [Hashing Algorithm]
- Example usage for public cloud: C:\>CertUtil -HashFile C:\Users\administrator\Desktop\AzureMigrateInstaller.zip SHA256
- Example usage for government cloud: C:\>CertUtil -HashFile C:\Users\administrator\Desktop\AzureMigrateInstaller-Server-USGov.zip SHA256
- Verify the latest appliance versions and hash values:
Run the Azure Migrate installer script
The installer script does the following:
- Installs agents and a web application for physical server discovery and assessment.
- Install Windows roles, including Windows Activation Service, IIS, and PowerShell ISE.
- Download and installs an IIS rewritable module. Learn more.
- Updates a registry key (HKLM) with persistent setting details for Azure Migrate.
- Creates the following files under the path:
- Config Files: %Programdata%\Microsoft Azure\Config
- Log Files: %Programdata%\Microsoft Azure\Logs
Run the script as follows:
- Extract the zipped file to a folder on the server that will host the appliance. Make sure you don’t run the script on a machine on an existing Azure Migrate appliance.
- Launch PowerShell on the above server with administrative (elevated) privilege.
- Change the PowerShell directory to the folder where the contents have been extracted from the downloaded zipped file.
- Run the script named ps1by running the following command:
- For the public cloud: PS C:\Users\administrator\Desktop\AzureMigrateInstaller> AzureMigrateInstaller.ps1
- For Azure Government: PS C:\Users\Administrators\Desktop\AzureMigrateInstaller-Server-USGov>AzureMigrateInstaller.ps1
The script will launch the appliance web application when it finishes successfully.
Configure the appliance
Set up the appliance for the first time.
- Open a browser on any machine that can connect to the appliance, and open the URL of the appliance web app: https://appliance name or IP address: 44368.
Alternatively, you can open the app from the desktop by clicking the app shortcut.
- In the web app > Set up prerequisites, do the following:
- License: Accept the license terms, and read the third-party information.
- Connectivity: The app checks that the server has internet access. If the server uses a proxy:
- Click Proxy Settings, and specify the proxy address and listening port, in the form http://ProxyIPAddress or http://ProxyFQDN.
- Specify credentials if the proxy needs authentication.
- Only HTTP proxy is supported.
- Time sync: Time is verified. The time on the appliance should be in sync with internet time for server discovery to work properly.
- Install updates: Azure Migrate Server Assessment checks that the appliance has the latest updates installed.
Register the appliance with Azure Migrate
- Click Log In. If it doesn’t appear, make sure you’ve disabled the pop-up blocker in the browser.
- On the new tab, sign in using your Azure credentials.
- Sign in with your username and password.
- Sign in with a PIN isn’t supported.
- After successfully signing in, go back to the web app.
- Select the subscription in which the Azure Migrate project was created. Then select the project.
- Specify a name for the appliance. The name should be alphanumeric with 14 characters or less.
- Click Register.
Start continuous discovery
Now, connect from the appliance to the physical servers to be discovered, and start the discovery.
- Click Add Credentials to specify the account credentials that the appliance will use to discover servers.
- Sign in with username and password. Sign in with a Key isn’t supported. Also, the User must be a root login or part of the local admin group.
- Specify the Operating System, a friendly name for the credentials, and the username and password. Then click Add. You can add multiple credentials for Windows and Linux servers.
- Click Add server, and specify server details- FQDN/IP address and friendly name of credentials (one entry per row) to connect to the server.
- Click Validate. After validation, the list of servers that can be discovered is shown.
- If validation fails for a server, review the error by hovering over the icon in the Status Fix issues, and validate again.
- To remove a server, select > Delete.
- After validation, click Save and start discovery to start the discovery process.
This starts the discovery. It takes around 1.5 minutes per server for metadata of the discovered servers to appear in the Azure portal.
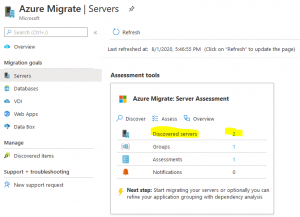
Verify servers in the portal
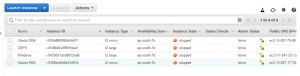
After discovery, you can verify that the servers appear in the Azure portal.
- Open the Azure Migrate dashboard.
- In Azure Migrate – Servers> Azure Migrate: Server Assessment page, click the icon that displays the count for Discovered servers.
Set up an assessment
There are two types of assessments you can create using Azure Migrate: Server Assessment.

Run an assessment
Run an assessment as follows:
- Review the best practices for creating assessments.
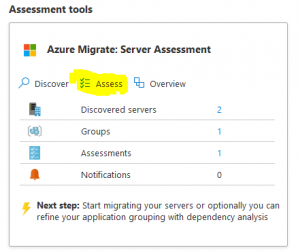
- In the Servers tab, in Azure Migrate: Server Assessment tile, click Assess.
In Assess servers, specify a name for the assessment.
Click View all to review the assessment properties.
- Select or create a group, select Create New, and specify a group name. A group gathers one or more servers together for assessment.
- In Add machines to the group, select servers to add to the group.
- Click Create Assessment to create the group, and run the assessment.
- After the assessment is created, view it in Servers> Azure Migrate: Server Assessment > Assessments.
- Click Export assessment, to download it as an Excel file.
Review and assessment
An assessment describes:
- Azure readiness: Whether servers are suitable for migration to Azure.
- Monthly cost estimation: The estimated monthly compute and storage costs for running the servers in Azure.
- Monthly storage cost estimation: Estimated costs for disk storage after migration.
View an assessment
- In Migration goals> Servers, click Assessments in Azure Migrate: Server Assessment.
- In Assessments, click on an assessment to open it.

Migrate machines as physical servers to Azure:
Migration tools
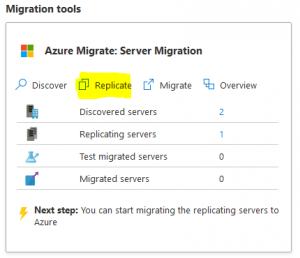
In the Azure Migrate project > Servers, Azure Migrate: Server Migration, click Replicate.
- In Replicate, > Source settings> Are your machines virtualized?, select Not virtualized/Other.
- In On-premises appliance, select the name of the Azure Migrate appliance that you set up.
- In-Process Server, select the name of the replication appliance.
- In Guest credentials, you specify a dummy account that will be used for installing the Mobility service manually (push install is not supported in Physical). Then click Next: Virtual machines.
- In Virtual Machines, in Import migration settings from an assessment?, leave the default setting No, I’ll specify the migration settings manually.
- Check each VM you want to migrate. Then click Next: Target settings.
- In Target settings, select the subscription, and target region to which you’ll migrate, and specify the resource group in which the Azure VMs will reside after migration.
- In Virtual Network, select the Azure VNet/subnet to which the Azure VMs will be joined after migration.
- In Azure Hybrid Benefit:
- Select No if you don’t want to apply for Azure Hybrid Benefit. Then click Next.
- Select Yes if you have Windows Server machines that are covered with active Software Assurance or Windows Server subscriptions, and you want to apply the benefit to the machines you’re migrating. Then click Next.
Track and monitor
- When you click Replicatea Start Replication job begins.
- When the Start Replication job finishes successfully, the machines begin their initial replication to Azure.
- After initial replication finishes, delta replication begins. Incremental changes to on-premises disks are periodically replicated to the replica disks in Azure.
You can track job status in the portal notifications.
You can monitor replication status by clicking on Replicating servers in Azure Migrate: Server Migration.
Run a test migration
When delta replication begins, you can run a test migration for the VMs, before running a full migration to Azure. We highly recommend that you do this at least once for each machine before you migrate it.
- Running a test migration checks that migration will work as expected, without impacting the on-premises machines, which remain operational, and continue replicating.
- Test migration simulates the migration by creating an Azure VM using replicated data (usually migrating to a non-production VNet in your Azure subscription).
- You can use the replicated test Azure VM to validate the migration, perform app testing, and address any issues before full migration.
Do a test migration as follows:
- In Migration goals> Servers > Azure Migrate: Server Migration, click Test migrated servers.

- Right-click the VM to test, and click Test migrate.
- In Test Migration, select the Azure VNet in which the Azure VM will be located after the migration. We recommend you use a non-production VNet.
- The Test migration job starts. Monitor the job in the portal notifications.
- After the migration finishes, view the migrated Azure VM in Virtual Machines in the Azure portal. The machine name has a suffix -Test.
- After the test is done, right-click the Azure VM in Replicating machines, and click Clean up test migration.
Migrate VMs
After you’ve verified that the test migration works as expected, you can migrate the on-premises machines.
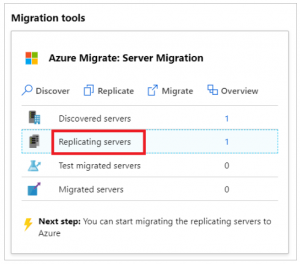
- In the Azure Migrate project > Servers> Azure Migrate: Server Migration, click Replicating servers.
2. In Replicating machines, right-click the VM > Migrate.
3. In Migrate > Shut down virtual machines and perform a planned migration with no data loss, select Yes > OK.
-
- If you don’t want to shut down the VM, select No
Note: For Physical Server Migration, the recommendation is to bring the application down as part of the migration window (don’t let the applications accept any connections) and then initiate the migration (The server needs to be kept running, so remaining changes can be synchronized) before the migration is completed.
- A migration job starts for the VM. Track the job in Azure notifications.
- After the job finishes, you can view and manage the VM from the Virtual Machines page.
Complete the migration
- After the migration is done, right-click the VM > Stop migration. This does the following:
- Stops replication for the on-premises machine.
- Removes the machine from the Replicating servers count in Azure Migrate: Server Migration.
- Cleans up replication state information for the machine.
- Install the Azure VM Windows or Linux agent on the migrated machines.
- Perform any post-migration app tweaks, such as updating database connection strings, and web server configurations.
- Perform final application and migration acceptance testing on the migrated application now running in Azure.
- Cutover traffic to the migrated Azure VM instance.
- Remove the on-premises VMs from your local VM inventory.
- Remove the on-premises VMs from local backups.
- Update any internal documentation to show the new location and IP address of the Azure VMs.
Azure migrate Common questions:
https://docs.microsoft.com/en-in/azure/migrate/resources-faq